User's Guide of Large-scale data analysis system
Japanese(日本語)
Create: 2019 Apr. 15
Last Update: 2025 Jan. 22
Table of contents:
0: Purpose of this guide
1: System Information
2: Application for use to LSC
2-1: Application for use to LSC (for HSC open-use observers)
2-2: Application for use to LSC (for general users)
3: How to use LSC
4: How to log in to the login node and usage guidelines
5: Home directory
6: Large work area (/gpfs)
7: Queue configuration
8: How to submit a job (with hscPipe)
8-1: with hscPipe:
8-2: without hscPipe:
9: Installed Software
10: Preparation for using hscPipe
11: File copy with MDAS:
12: Data sharing among multiple users:
12: Helpdesk
0: Purpose of this guide:
This guide introduces the basic usage of Large-scale data analysis system(LSC) and the method
to execute HSC's data analysis pipeline "hscPipe" on this system under the job
management system.
For details on Multi-Wavelength Data Analysis System (MDAS), refer to MDAS,
and for details on HSC and hscPipe, refer to Hyper Suprime-Cam.
If you have installed hscPipe with user privileges, refer to "the second Supplement in 9:Installed Software",
and be sure to execute the commands presented there.
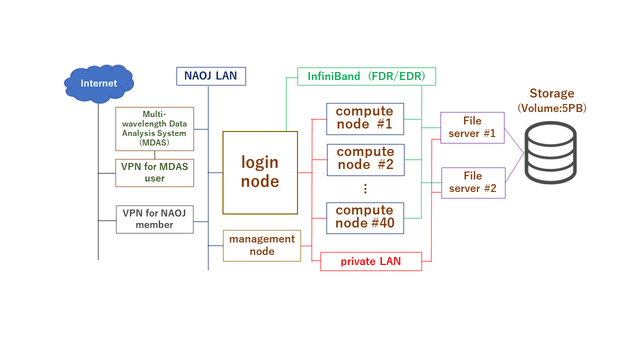
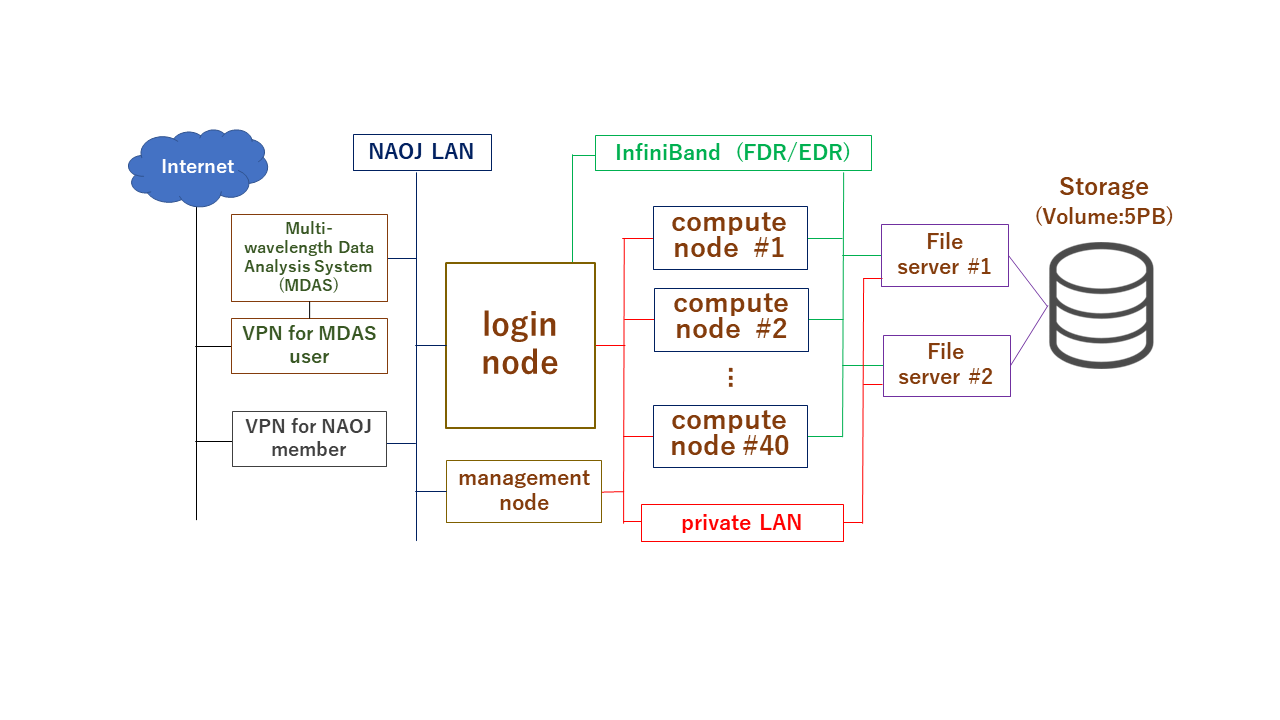
1: System Information:
Large-scale data analysis system(LSC):
Login node: 1 FQDN: lsc.ana.nao.ac.jp
OS: RHEL7
Compute nodes: 40 Total number of CPU core: 2,296 2,240,
39 Total amount of Memory: 24.5TB 23.5TB
OS: RHEL7/CentOS7 → CentOS7 (2024/04/04-)
Home directory: 36TB Quota: 200GB (Soft-limit:195GB)
Large work volume: 5PB /gpfs File-system: IBM Storage Scale, quota:30TB
Management of Job: PBS Professional Open-source edition
Details of Specification:
- Login node:
CPU: Intel(R) Xeon(R) Silver 4114 2.2GHz 10core x2
Memory: 256GB
OS: Red Hat Enterprise Linux 7.9
- Compute nodes:
- an[01-02*]
CPU: Intel(R) Xeon(R) Gold 6132 2.6GHz 14core x4
Memory: 1TB (PBS available:950GB)
OS: Red Hat Enterprise Linux 7.6 → CentOS Linux 7.6 (2023/09/21-) → 7.7 (2025/03/04-) → 7.9 (2025/09/01-)
(* Due to a malfunction, an02 ceased operation on April 7, 2025)
- an[03-05]
CPU: Intel(R) Xeon(R) Gold 6132 2.6GHz 14core x4
Memory: 1TB (PBS available:950GB)
OS: Red Hat Enterprise Linux 7.6 → CentOS Linux 7.6 (an0[3,4]:2023/11/15-, an05:2024/04/04-) → 7.7 (2025/03/04-) → 7.9 (2025/09/01-)
- an[06-07]
CPU: AMD EPYC 7601 2.2GHz 32core x2
Memory: 512GB (PBS available:455GB)
OS: CentOS Linux 7.6 → 7.7 (2025/03/04-) → 7.9 (2025/09/01-)
- an[08-29]
CPU: AMD EPYC 7742 2.25GHz 64core
Memory: 512GB (PBS available:455GB)
OS: CentOS Linux 7.7 → 7.9 (2025/09/01-)
- an[30-36]
CPU: AMD EPYC 7742 2.25GHz 64core
Memory: 1024GB (PBS available:940GB)
OS: CentOS Linux 7.7 → 7.9 (2025/09/01-)
- an[91-94]
CPU: Intel(R) Xeon(R) W-2145 3.70GHz 8core
Memory:
an9[1-2,4]: 128GB (+ Swap:2,048GB) (PBS available:1,990GB)
an93: 128GB (+ Swap:2,000GB) (PBS available:1,940GB)
OS: CentOS Linux 7.7 → 7.9 (2025/09/01-)
System Configuration:
 2: Application for use to LSC:
The procedure of application to use this system differs depending on
whether or not the applicant is an HSC open-use observer (PI+CoI, including
intensive program) of the current semester.
Please refer to the one that applies to you.
2-1: Application for use to LSC (for HSC open-use observers)
Subaru Telescope will send the announcement of LSC to the PIs of the eligible
HSC proposals before the semester begins. Please read the instruction in
the announcement.
Please email the observatory contact (daikibo [at-mark] naoj.org, [at-mark]
replaces "@") for inquiries on the LSC use for HSC open-use observers.
2-2: Application for use to LSC (for general users)
We accept application for general users at any time.
Please apply from the Application for General Use.
3: How to use LSC:
In the system, computational resources on compute nodes are managed by job management software
(PBS Professional). Users can execute analysis processing on compute nodes by logging in to
login nodes and submitting jobs.
We do not allow logins to compute nodes, usage other than the system specified, and usage not
via job management software.
Please note that if we find such a use, relevant processes and login session may be terminated
without notice.
4: How to log in to login-node and usage guidelines:
Users from within the NAOJ can log in to LSC with SSH.
FQDN of login node: lsc.ana.nao.ac.jp
To login, use MDAS account.
From outside the NAOJ, users can log in to LSC with SSH
via VPN for NAOJ members or VPN of MDAS.
LSC shares the account information with MDAS. These pieces of registration information, however,
can not be changed on LSC. Make changes in MDAS.
Effective December 2025, usage limitations have been introduced for the computing resources on
the login node.
- CPU usage is limited to 200% per user (equivalent to two cores running at full capacity).
- Memory usage is limited to 125GB for all users combined.
Please ensure that the login node is used only for light processes, such as job submission and preparation.
Processes that require significant computing resources shoould be carried out on the compute nodes.
5: Home directory:
There is a 200GB quota on the home area. Please use the large work area (/gpfs) for analysis.
Users can check the usage and quota information of home area by executing
quota (-s)
on login node. ( option '-s': adjust unit of quantity automatically)
(It notes that the area name is displayed as "nas01:/mnt/nas/LUN_NAS" instead of "/home".)
6: Large work area (/gpfs):
Create a directory with your own account name in the large work area (/gpfs) and use the directory.
This work area can be read and written by all login/compute nodes on LSC, with a 30TB quota (effective June 2, 2025).
(Regular) data deletion is not implemented in the current operation, however,
this may be implemented depending on future usage status.
Users can check the current usage of gpfs area in "/gpfs/usage_info/[account name].txt".
This information is updated every hour at 0 minutes.
7: Queue configuration:
2: Application for use to LSC:
The procedure of application to use this system differs depending on
whether or not the applicant is an HSC open-use observer (PI+CoI, including
intensive program) of the current semester.
Please refer to the one that applies to you.
2-1: Application for use to LSC (for HSC open-use observers)
Subaru Telescope will send the announcement of LSC to the PIs of the eligible
HSC proposals before the semester begins. Please read the instruction in
the announcement.
Please email the observatory contact (daikibo [at-mark] naoj.org, [at-mark]
replaces "@") for inquiries on the LSC use for HSC open-use observers.
2-2: Application for use to LSC (for general users)
We accept application for general users at any time.
Please apply from the Application for General Use.
3: How to use LSC:
In the system, computational resources on compute nodes are managed by job management software
(PBS Professional). Users can execute analysis processing on compute nodes by logging in to
login nodes and submitting jobs.
We do not allow logins to compute nodes, usage other than the system specified, and usage not
via job management software.
Please note that if we find such a use, relevant processes and login session may be terminated
without notice.
4: How to log in to login-node and usage guidelines:
Users from within the NAOJ can log in to LSC with SSH.
FQDN of login node: lsc.ana.nao.ac.jp
To login, use MDAS account.
From outside the NAOJ, users can log in to LSC with SSH
via VPN for NAOJ members or VPN of MDAS.
LSC shares the account information with MDAS. These pieces of registration information, however,
can not be changed on LSC. Make changes in MDAS.
Effective December 2025, usage limitations have been introduced for the computing resources on
the login node.
- CPU usage is limited to 200% per user (equivalent to two cores running at full capacity).
- Memory usage is limited to 125GB for all users combined.
Please ensure that the login node is used only for light processes, such as job submission and preparation.
Processes that require significant computing resources shoould be carried out on the compute nodes.
5: Home directory:
There is a 200GB quota on the home area. Please use the large work area (/gpfs) for analysis.
Users can check the usage and quota information of home area by executing
quota (-s)
on login node. ( option '-s': adjust unit of quantity automatically)
(It notes that the area name is displayed as "nas01:/mnt/nas/LUN_NAS" instead of "/home".)
6: Large work area (/gpfs):
Create a directory with your own account name in the large work area (/gpfs) and use the directory.
This work area can be read and written by all login/compute nodes on LSC, with a 30TB quota (effective June 2, 2025).
(Regular) data deletion is not implemented in the current operation, however,
this may be implemented depending on future usage status.
Users can check the current usage of gpfs area in "/gpfs/usage_info/[account name].txt".
This information is updated every hour at 0 minutes.
7: Queue configuration:
| Queue name |
Priority |
Number of available
CPU cores |
Amount of available
memory(unit:GB) |
Number of executable jobs |
Maximum Wall time |
Execution node |
| Max. |
default |
Max. |
default |
Hard |
Soft |
| qssp |
very high |
1,536 |
64 |
13,950 |
11,250 |
--- |
--- |
1,000 days |
an[13-36] |
| qh |
high |
640 |
56 |
4,500 |
450 |
--- |
--- |
1,000 days |
an[01-11,21-36] |
| qm |
medium |
112 |
56 |
1,800 |
450 |
2 |
1 |
15 days |
an[01-11] |
| ql |
low |
32 |
28 |
450 |
225 |
2 |
1 |
7 days |
an[01-11] |
| qt |
very high |
4 |
4 |
64 |
64 |
1 |
1 |
10 minutes |
an[01-11] |
| qhm |
medium |
32 |
8 |
7,910 |
1,940 |
--- |
1 |
15 days |
an[91-94] |
Note:
- Available queues vary depending on the user privileges.
* The 'qssp' queue is a queue for HSC-SSP (The Hyper Suprime-Cam Subaru Strategic Program)
data processing only.
* The open-use observers approved by the observatory can use the queues 'qm', 'qt', and 'qhm'
in the current operation.
* The general users can use the queues 'ql', 'qt', and 'qhm' in the current operation.
- The 'qt' queue is a test-only queue for checking the operation of job scripts and
for other tests.
- The 'qhm' queue is a queue for analysis that requires more than 1TB of memory per
process and cannot be executed on other compute nodes.
Jobs that use the 'qhm' queue only run on the nodes with 2TB swap (an[91-94]).
- Computing resource allocation and number of running jobs may change depending on usage.
8: How to submit a job:
We introduce how to submit a job separately depending on with hscPipe or not.
For more information on PBS Professional, including PBS commands, PBS directives, and
PBS environment variables, refer to 「User's Guide of previous MDAS, Section 4.2.4」
8-1: with hscPipe:
To execute each process of hscPipe on compute nodes, prepare a job script and submit it as a
job by "qsub" command.
The procedure for creating a job script for each process of hscPipe differs depending on
whether the command of hscPipe with/without "--batch-type" in option.
A: for command with "--batch-type" in option:
1. When executing hscPipe for each process, adds
"--batch-type=pbs --time 100000 --nodes 2 --procs 112 --dry-run"
as arguments.
(The time, the number of nodes and CPU cores may be appropriate,
because these can be changed in step 3.)
2. Copy the output temporary file to the work area.
3. Open the file copied in step 2 with an editor, and edit as follows.
3-1: edit PBS directives
Edit the PBS directives at the beginning of file to appropriate ones,
and add the necessary PBS directives.
Example 1: (when using queue "qm", and "total 112 cores and memory:1792GB" as
computational resources)
#PBS -q qm (use queue "qm")
#PBS -m a (send email when a job is aborted)
#PBS -l select=112:ncpus=1:mpiprocs=1:mem=16g
(restrict computational resources:
use 112cores and 1,792GB memory (16GB per core)
#PBS -M tenmon.tarou@nao.ac.jp (destination email address, ※8-1-1)
#PBS -N qm_CB (name the job "qm_CB")
#PBS -l walltime=24:00:00 (restrict maximum wall time to 24 hours)
#PBS -o log_qsub_CB.out (set standard output to file:log_qsub_CB.out)
#PBS -e log_qsub_CB.err (set standard error output to file:log_qsub_CB.err)
Supplement:
Description examples of "#PBS -l ..." according to the required computing resources:
- when using 112cores and 896GB memory (8GB per core):
#PBS -l select=112:ncpus=1:mpiprocs=1:mem=8g
- when using 28cores and 448GB memory (16GB per core):
#PBS -l select=28:ncpus=1:mpiprocs=1:mem=16g
Example 2: (when using queue "ql", and "total 28 cores and memory:448GB" as
computational resources)
#PBS -q ql (use queue "ql")
#PBS -m a (send email when a job is aborted)
#PBS -l select=28:ncpus=1:mpiprocs=1:mem=16g
(restrict computational resources:
use 28cores and 448GB memory (16GB per core)
#PBS -M tenmon.tarou@nao.ac.jp (destination email address, ※8-1-1)
#PBS -N ql_CB (name the job "ql_CB")
#PBS -l walltime=24:00:00 (restrict maximum wall time to 24 hours)
#PBS -o log_qsub_CB.out (set standard output to file:log_qsub_CB.out)
#PBS -e log_qsub_CB.err (set standard error output to file:log_qsub_CB.err)
Example 3: (when using queue "ql", and "total 32 cores and memory:448GB" as
computational resources)
Replace the "#PBS -l select..." line in Example 2 with the following:
#PBS -l select=32:ncpus=1:mpiprocs=1:mem=14g
(restrict computational resources:
use 32cores and 448GB memory (14GB per core)
Other lines are the same as in Example 2.
※8-1-1: Please avoid using a Gmail address for the 'Destination Email Address' as much as possible.
We currently have strong restrictions on sending emails to Gmail addresses, and sending a
large volume of emails can cause delays in job email delivery. We also have moderate sending
restrictions for non-Gmail addresses, so please set up appropriate notification settings based
on the number of jobs submitted to prevent a large volume of emails from being sent in a short period.
3-2: edit the mpiexec line
Write arguments on and after python in mpiexec line in another file,
give execution permission to the file, and replace the arguments with
the file name specified by full path.
e.g.: In case of constructBias.py:
- Write on and after python of "mpiexec python -c 'import os; os.umask(0o002); ..."
in the file "exec_CB.sh", and give execution permission to the file.
chmod u+x exec_CB.sh
cat exec_CB.sh
-> python -c 'import os; os.umask(0o002); ...
- Replace the arguments of mpiexec with the file name specified by full path.
mpiexec /Full Path/exec_CB.sh
Reference: Command to execute the above: (Operation confirmed on hscPipe7)
$ dirb=$(pwd) # File location (any: here is the current directory)
$ fnqs=qsub_CB.sh # Job script name to be edited (any)
$ pyfn=exec_CB.sh # File name to write arguments on and after python (any)
$ grep ^mpiexec ${fnqs} | sed -e "s/mpiexec\ \+python/python/" > ${pyfn}
$ chmod u+x ${pyfn}
$ sed -i.bak "/mpiexec/s|python .\+$|${dirb}/${pyfn}|" ${fnqs}
← File before editing remains as "$fnqs}.bak".
(To overwrite without saving, replace "-i.bak" with "-i ")
4. Execute qsub command with the job script created in step 3 as an argument.
qsub -V [file name of job script]
B: for command without "--batch-type" in option:
(e.g. mosaic.py, jointcal.py)
1. Create a new job script. Open a new file in an editor, write the shebang of shell on line 1
(e.g. #!/usr/bin/env bash) and the PBS directives on line 2 and beyond (refer to A-3).
Supplement:
Description examples of "#PBS -l ..." according to the required computing resources:
(the examples to run on one node, unlike those in A-3-1)
- when using 1node with 64cores and 450GB memory:
#PBS -l select=1:ncpus=64:mpiprocs=64:mem=450g
- when using 1node with 28cores and 225GB memory:
#PBS -l select=1:ncpus=28:mpiprocs=28:mem=225g
2. Below the PBS directives, write hscPipe preparation commands (refer to 「10: Preparation for using hscPipe」),
change-directory command, and the hscPipe command to be executed.
3. Execute qsub command with the job script created in step 2 as an argument.
qsub -V [file name of job script]
8-2: without hscPipe:
Even if to execute commands on compue nodes without hscPipe, prepare a job script and submit it as a
job by "qsub" command.
1. Create a new job script. Open a new file in an editor, write the shebang of shell on line 1
(e.g. #!/usr/bin/env bash) and the PBS directives on line 2 and beyond (refer to A-3 in 8-1).
Supplement:
Description examples of "#PBS -l ..." according to the required computing resources:
- when using 28cores and 448GB memory (16GB per core):
#PBS -l select=28:ncpus=1:mpiprocs=1:mem=16g
(the examples that may run on multiple nodes)
- when using 1node with 28cores and 225GB memory:
#PBS -l select=1:ncpus=28:mpiprocs=28:mem=225g
(the examples to run on one node)
2. Below the PBS directives, write change-directory command and the command to be executed.
3. Execute qsub command with the job script created in step 2 as an argument.
qsub -V [file name of job script]
9: Installed Software:
Name version PATH
- hscPipe 4.0.5 /opt/hscpipe/4.0.5/(bashrc) ※1
5.4 /opt/hscpipe/5.4/(bashrc)
6.7 /opt/hscpipe/6.7/(bashrc)
7.9.1 /opt/hscpipe/7.9.1/(bashrc)
8.4 /opt/hscpipe/8.4_anaconda/(loadLSST.bash)
8.5.3 /opt/hscpipe/8.5.3_anaconda/(loadLSST.bash)
- ds9 8.0.1 /usr/local/bin/ds9
- fv 5.5 /usr/local/fv/fv
- WCSTools 3.9.5 /usr/local/WCSTools/bin
- gnuplot 5.2.7 /usr/local/bin/gnuplot
- mpich 3.2.1 /usr/local/mpich/3.2.1
- PBS Pro. 19.1.2 /opt/pbs
※1 The catalog file of 4.0.5 for astrometry has not been introduced.
Supplement:
- Software that can be installed with user privileges can also be installed in the shared area (/home or /gfps) of the system.
If there are any libraries and/or files that need to be installed in the system area, please contact the help desk.
- If you installed hscPipe with user privileges, execute the following commands after installation.
(If not executed, the job management software will not be able to properly control jobs with hscPipe that you have installed.)
bash (optional, execute only if the default shell is not bash.)
execute hscPipe preparing commands
(for example, in the build edition, execute the following:
source /path/to/hscPipe/loadLSST.bash
setup hscPipe [version number])
com=$(which mpiexec); comd=${com%/*}; echo ${com}; echo ${comd}
cp -a ${comd} ${comd}.org
mv -v ${com} ${com}.actual
ln -s /opt/pbs/bin/pbsrun.mpich ${com}
ls -l ${com} ${com}.actual
-> It is OK if mpiexec is a link to /opt/pbs/bin/pbsrun.mpich and mpiexec.actual is a link to mpiexec.hydra.
(Since "/opt/pbs/bin/pbsrun.mpich" does not exist on the login node, the output of "ls -l ${com}" is
displayed as a broken link, but there is no problem because it exists on the compute nodes.)
10: Preparation for using hscPipe:
10.1: hscPipe 4.0.5, 5.4, 6.7, 7.9.1※2
unset LD_LIBRARY_PATH
source /opt/hscpipe/{4.0.5,5.4,6.7,7.9.1}/bashrc
setup-hscpipe
※2 Before executing mosaic.py of hscPipe 7.9.1, you need to execute the following command:
$ export LD_LIBRARY_PATH="${LD_LIBRARY_PATH}:/opt/hscpipe/7.9.1/lib64"
(above for bash)
10.2: hscPipe 8.4, 8.5.3
unset LD_LIBRARY_PATH
source /opt/hscpipe/{8.4,8.5.3}_anaconda/loadLSST.bash
setup hscPipe {8.4,8.5.3}
11: File copy with MDAS:
Copying files to and from the MDAS can be achieved by executing the scp or rsync command.
You can also use the directly mounted "lsc:/lwk" area, but we have confirmed an issue where
the modification date and time (mtime) of files and directories changes to the status-change
date and time (ctime) (*3).
Therefore, if you want a copy that retains the correct modification date and time, we do not
recommend using "lsc:/lwk".
※3 This problem occurs even if you use the option to save timestamps. The probability of occurrence
is not constant, but in previous studies it was around a few percent.
e.g. copy mana01:/home/username/filename to /gpfs/username/
scp -p mana01:/home/username/filename /gpfs/username/
12: Data sharing among multiple users:
You can use the group ID of the MDAS on this system as well.
Using this function, it is possible to share data files among
multiple users, such as members of the same research group.
Please apply for a group ID from the Group ID application page of MDAS.
The method of using group IDs on this system is the same as
that on MDAS, so please refer to the MDAS Group ID User's Guide.
13: Help desk:
If you have any questions about "hscPipe" or HSC data reduction, please contact following address:
helpdesk [at-mark] hsc-software.mtk.nao.ac.jp
([at-mark] replaces "@")
If you have any questions except for the above, please contact following address:
lsc-consult [at-mark] ana.nao.ac.jp
([at-mark] replaces "@")
 2: Application for use to LSC:
The procedure of application to use this system differs depending on
whether or not the applicant is an HSC open-use observer (PI+CoI, including
intensive program) of the current semester.
Please refer to the one that applies to you.
2-1: Application for use to LSC (for HSC open-use observers)
Subaru Telescope will send the announcement of LSC to the PIs of the eligible
HSC proposals before the semester begins. Please read the instruction in
the announcement.
Please email the observatory contact (daikibo [at-mark] naoj.org, [at-mark]
replaces "@") for inquiries on the LSC use for HSC open-use observers.
2-2: Application for use to LSC (for general users)
We accept application for general users at any time.
Please apply from the Application for General Use.
3: How to use LSC:
In the system, computational resources on compute nodes are managed by job management software
(PBS Professional). Users can execute analysis processing on compute nodes by logging in to
login nodes and submitting jobs.
We do not allow logins to compute nodes, usage other than the system specified, and usage not
via job management software.
Please note that if we find such a use, relevant processes and login session may be terminated
without notice.
4: How to log in to login-node and usage guidelines:
Users from within the NAOJ can log in to LSC with SSH.
FQDN of login node: lsc.ana.nao.ac.jp
To login, use MDAS account.
From outside the NAOJ, users can log in to LSC with SSH
via VPN for NAOJ members or VPN of MDAS.
LSC shares the account information with MDAS. These pieces of registration information, however,
can not be changed on LSC. Make changes in MDAS.
Effective December 2025, usage limitations have been introduced for the computing resources on
the login node.
- CPU usage is limited to 200% per user (equivalent to two cores running at full capacity).
- Memory usage is limited to 125GB for all users combined.
Please ensure that the login node is used only for light processes, such as job submission and preparation.
Processes that require significant computing resources shoould be carried out on the compute nodes.
5: Home directory:
There is a 200GB quota on the home area. Please use the large work area (/gpfs) for analysis.
Users can check the usage and quota information of home area by executing
quota (-s)
on login node. ( option '-s': adjust unit of quantity automatically)
(It notes that the area name is displayed as "nas01:/mnt/nas/LUN_NAS" instead of "/home".)
6: Large work area (/gpfs):
Create a directory with your own account name in the large work area (/gpfs) and use the directory.
This work area can be read and written by all login/compute nodes on LSC, with a 30TB quota (effective June 2, 2025).
(Regular) data deletion is not implemented in the current operation, however,
this may be implemented depending on future usage status.
Users can check the current usage of gpfs area in "/gpfs/usage_info/[account name].txt".
This information is updated every hour at 0 minutes.
7: Queue configuration:
2: Application for use to LSC:
The procedure of application to use this system differs depending on
whether or not the applicant is an HSC open-use observer (PI+CoI, including
intensive program) of the current semester.
Please refer to the one that applies to you.
2-1: Application for use to LSC (for HSC open-use observers)
Subaru Telescope will send the announcement of LSC to the PIs of the eligible
HSC proposals before the semester begins. Please read the instruction in
the announcement.
Please email the observatory contact (daikibo [at-mark] naoj.org, [at-mark]
replaces "@") for inquiries on the LSC use for HSC open-use observers.
2-2: Application for use to LSC (for general users)
We accept application for general users at any time.
Please apply from the Application for General Use.
3: How to use LSC:
In the system, computational resources on compute nodes are managed by job management software
(PBS Professional). Users can execute analysis processing on compute nodes by logging in to
login nodes and submitting jobs.
We do not allow logins to compute nodes, usage other than the system specified, and usage not
via job management software.
Please note that if we find such a use, relevant processes and login session may be terminated
without notice.
4: How to log in to login-node and usage guidelines:
Users from within the NAOJ can log in to LSC with SSH.
FQDN of login node: lsc.ana.nao.ac.jp
To login, use MDAS account.
From outside the NAOJ, users can log in to LSC with SSH
via VPN for NAOJ members or VPN of MDAS.
LSC shares the account information with MDAS. These pieces of registration information, however,
can not be changed on LSC. Make changes in MDAS.
Effective December 2025, usage limitations have been introduced for the computing resources on
the login node.
- CPU usage is limited to 200% per user (equivalent to two cores running at full capacity).
- Memory usage is limited to 125GB for all users combined.
Please ensure that the login node is used only for light processes, such as job submission and preparation.
Processes that require significant computing resources shoould be carried out on the compute nodes.
5: Home directory:
There is a 200GB quota on the home area. Please use the large work area (/gpfs) for analysis.
Users can check the usage and quota information of home area by executing
quota (-s)
on login node. ( option '-s': adjust unit of quantity automatically)
(It notes that the area name is displayed as "nas01:/mnt/nas/LUN_NAS" instead of "/home".)
6: Large work area (/gpfs):
Create a directory with your own account name in the large work area (/gpfs) and use the directory.
This work area can be read and written by all login/compute nodes on LSC, with a 30TB quota (effective June 2, 2025).
(Regular) data deletion is not implemented in the current operation, however,
this may be implemented depending on future usage status.
Users can check the current usage of gpfs area in "/gpfs/usage_info/[account name].txt".
This information is updated every hour at 0 minutes.
7: Queue configuration: